Posts

Showing posts from 2013

How to change CRX password?

Image
a)   Open CRX explorer through http://localhost:4502/crx/explorer/index.jsp b)       Click on User Administration and Users à a à admin c)       Admin properties window will be opened on click of admin d)       Click on Change Password to change the password. Enter old password and new passwords. You should get a confirmation message that password has been changed successfully. 

CQ - How to change admin password?

a)       Open admin console( http://localhost:4502/projects.html ) by logging in through admin/admin b)       Click on Tools link and Users (Manage your users) link c)       User Management window is opened. Click on Administrator or other user for which password needs to be changed. d)       Click on Change Password link to change the password. Click on sign out coming on and login with new password.

CQ - What is OSGi bundle?

OSGi bundle(jar + metadata information present in META-INF/MANIFEST.MF) is collection of components which interact through service interfaces. These services are built using OSGi API and deployed in OSGi container (Apache Felix in case of CQ).  Advantages of OSGi is ·          Different modules can be installed/uninstalled/start/stop any time without restarting the server/container. ·          Different version of same module can be used in the same application which is not possible using java. System bundle is the first bundle loaded in Apache Felix (OSGi console). It is similar to bootstrap classloader in java. Bundle can be uploaded into Felix(OSGi container) through two ways a)       CQ web console b)       Putting the bundle file in install folder in jcr

CQ - How to set reverse replication from publisher to author instance

There are some forms (comments/discussions, contact us etc.) on the features which allows user to enter their input on the publisher instance. That data should be replicated back to author instance. It is called as reverse replication. Below are steps for reverse replication. a)       Open tools console and double click on Replication Agents on Author Reverse Replication Agent. Please note that it needs to be done on Author and not on publisher. b)       Double click on Reverse Replication Agent to edit its configuration. c)       Click on Transport tab to change the port to publisher port (4503 in our case) and click on OK.  d)       Now publish any comment on publisher page and it should get replicated to author instance also .e.g. post a comment on http://localhost:4503/content/geometrixx-outdoors/en/community/hiking/journal/2012/12/best_gps_for_hik...

CQ - How to set replication automatically from Author instance to publisher instance

a)       Open tools console and double click on Replication à Agents on Author à Default Agent b)       It will open Default Agent in a new window as c)       Click on Edit button to open its configuration d)       Click on Transport tab and change the port number mentioned in URI tab to the port number of publisher. Once it is changed, click on OK to apply the changes. You can now edit any content in author environment and that should be automatically replicated on publisher environment. Note – There should be one replication agent for one publisher environment. It means if you want to replicate one author to two publisher instance, then two replication agent needs to be set on the tools console.

CQ - How to create a Blueprint?

a)       Open Tools console through http://localhost:4502/miscadmin b)       Expand MSM control center and click on New -> New Page button appearing on right hand side c)        It will open a dialog box similar to one shown below. Enter Title and Name. d)       You should be able to see the Test Blueprint Template under MSM control center  e)       Double click on the Test Blueprint Template row to open the Blueprint. It will open Test Blueprint in a new browser tab ( http://localhost:4502/etc/blueprints/TestBlueprint.html ). f)       Click on Edit button to enter source path,thumbnail image etc. g)       It should appear in the console  h)       Now we should be able to create a new site using new blueprint through site admin Reference - http://...

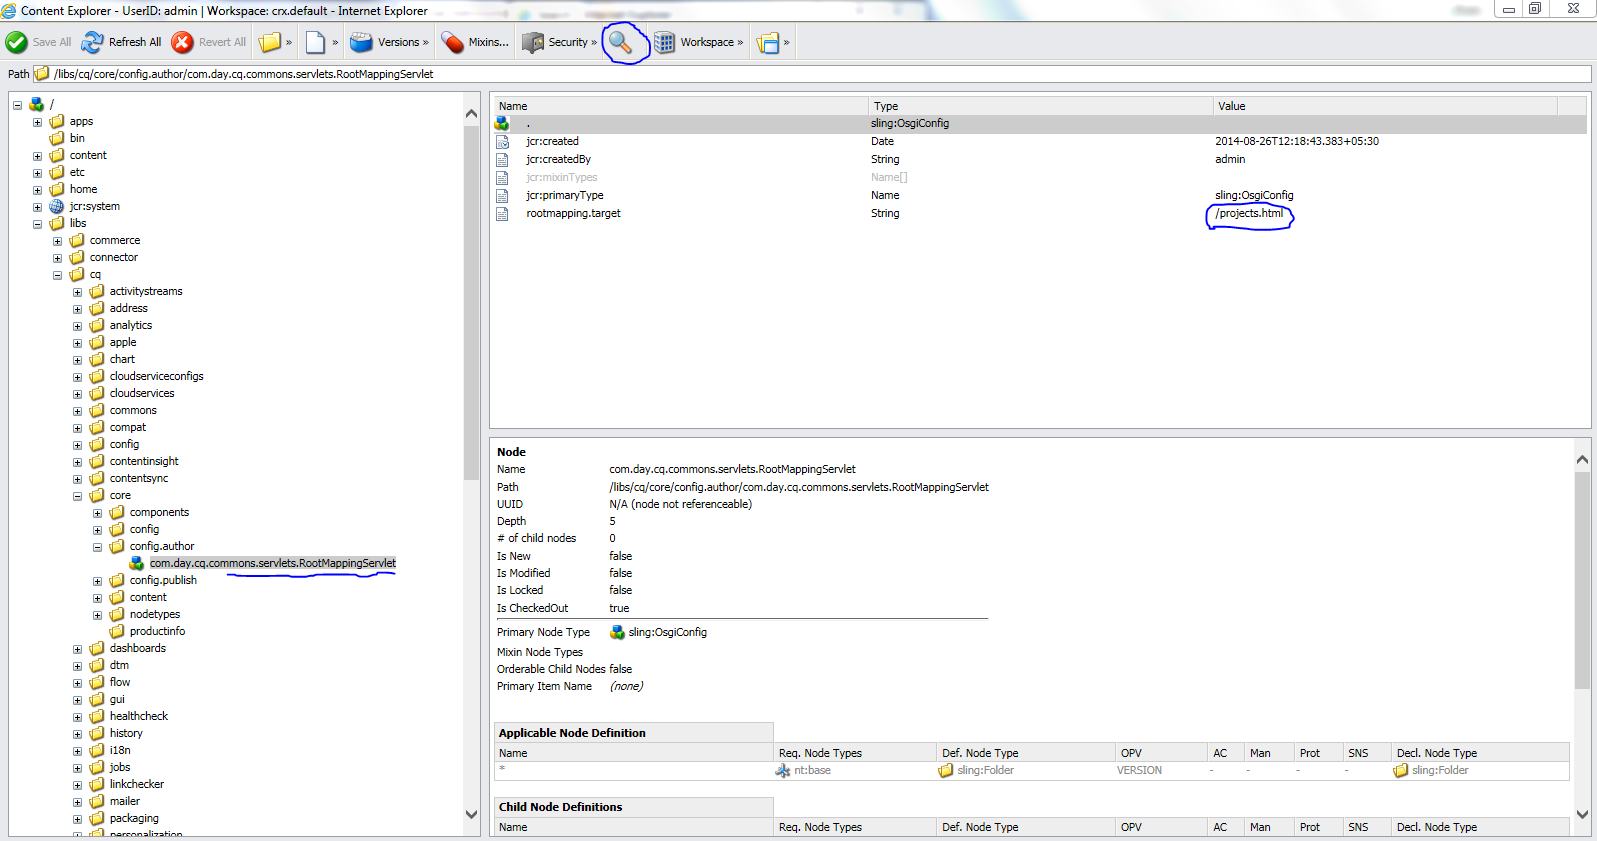
CQ - How to change default landing page from project.html (touch view) to welcome.html(classic view)?

Image
There are two approaches to change the default landing page. One is through CRX explorer and other is through OSGi console First approach (CRX explorer) a)       Open Content Explorer through http://localhost:4502/crx/explorer/index.jsp and click on Content Explorer hyperlink b)       Search for projects.html through the search icon as shown in below screenshot c)        Click on RootMappingServlet and change the value from /projects.html to welcome.html d)       Save the configuration and open localhost:4502 again. It should open welcome.html by default Second approach (OSGi/Web console)   Other approach is to change it through OSGi (Web) console. Below are steps to change is through web console a)       Open OSGi/Web console through http://localhost:4502/system/console/configMgr and click on OSGi--> Configuration....

CQ - Step by Step procedure to create a campaign and publish it in CQ 5.6

Below are the steps to create a campaign and publish it on website. Open campaign management console assuming CQ is running on port 4502 ( http://localhost:4502/mcmadmin#/content/dashboard ) Click on campaign tab. It will show list of all brands and campaigns. Hierarchy should like Brands --> Campaigns --> Teasers. It means first Brand should be created and then campaign and then teaser. Click on Campaigns tab and then click on New to create new Brand. Make sure to select Brand as template and enter any name say myBrand. Once brand is created, click on myBrand appearing on the left hand side. Now click on new button to create a campaign. Make sure Campaign template is selected and enter any name say myCampaign. It will create a campaign by name of myCampaign. Click on myCampaign and properties to enter priority, On/Off time(Campaign activation period),image. Lets assume our requirement is to create multiple teasers for different segments(female and male). So before cre...

CQ - Setting up clustering in CQ 5.6

Pre requisite Copy your cq instance to another directory to have two instances of cq running in order to setup cluster on two instances. One of the instance will work as Master instance and another one will work as slave. Change port number of another instance to 4503 assuming first instance is running on port 4502. Steps to set up clustering in CQ 5.6 Goto <cq slave installation directory>\crx-quickstart\repository directory. Delete  cluster_node.id file present inside repository directory. Open <cq master installation directory>\crx-quickstart\repository\cluster_node.id and copy the value. Open  <cq slave installation directory>\crx-quickstart\repository\cluster.properties. Put value of clusterid copied from master instance to members key. Let's say "22410d70-250e-494b-b711-6c264d5a57bc" was cluster id of master node, then put this value under members key as shown below.            #Cluster properties ...

Brief guide to ecommerce

Electronic Commerce (commonly known as Ecommerce) – In simpler form, ecommerce is a concept where buying and selling of product or service is conducted over electronic systems such as the Internet by the businesses and consumers. In other words, if a transaction is done over the internet then it is ecommerce. Now a days, we use ecommerce in one way or the other. It might be in form of buying ticket through irctc, buying/selling a product on a site, downloading a proprietary software or video after paying to vendor etc. are some of the examples of ecommerce form. Ecommerce was started around 1979 by Michael Aldrich (as per Wikipedia). Earlier we had only Brick and Mortar stores. Brick and mortar businesses are companies that have a physical presence and offer face-to-face customer experiences. E.g. Walmart, Best Buy etc. These companies have online as well as offline presence. Traditional Commerce versus Ecommerce Traditional commerce Ecommerce Information...

Frequently used Java design patterns

I am writing blogs on design pattern because I couldn't find a site where I can get good information about all the design patterns. So I referred different sites and consolidating design pattern in this blog. Please help me in improving this blog by commenting on it. Below are three different categories on java design patterns. Creational Design pattern Singleton Pattern Factory Design Pattern Abstract Factory Design Pattern Builder Pattern Prototype Pattern Structural Design pattern Adaptor Pattern Bridge Pattern Decorator Pattern Facade Pattern Proxy Pattern Composite Pattern Flyweight Pattern Behavioral design pattern Chain of Responsibility Pattern Command Pattern Observer Pattern State Pattern Strategy Pattern Template Pattern Visitor Pattern Interpreter Pattern Iterator Pattern Mediator Pattern Momento Pattern We will not be discussing about all design pattern here. Instead we will discuss about most commonly used pattern. S...

Installing and running MongoDB on windows environment

Below are the steps to download and run MongoDB on Windows Download stable release of MongoDB from http://www.mongodb.org/downloads Extract the tar/zip file in any folder. Create a directory named as “data\db” inside MongoDb folder. Start MongoDB using command “ mongod --dbpath ..\data ”. Here ..\data is the path to data directory, which is required to store data files. This is most important option we need to specify. Please note that directory path you are providing should exists otherwise process won’t start.   Open a new command prompt and go to bin directory of MongoDB installation folder. Run command “ mongo ” which will let you to execute any MongoDB command through the prompt. MongoDB commands Below are some of MongoDB frequently used commands – Displaying list of databases show dbs Selecting a particular database e.g. “local” database Use local Verifying db. Current db can be verified using below command Db Mongo Help. At any poi...