Posts

Showing posts from September, 2013

How to change CRX password?

Image
a)   Open CRX explorer through http://localhost:4502/crx/explorer/index.jsp b)       Click on User Administration and Users à a à admin c)       Admin properties window will be opened on click of admin d)       Click on Change Password to change the password. Enter old password and new passwords. You should get a confirmation message that password has been changed successfully. 
CQ - How to change admin password?

a)       Open admin console( http://localhost:4502/projects.html ) by logging in through admin/admin b)       Click on Tools link and Users (Manage your users) link c)       User Management window is opened. Click on Administrator or other user for which password needs to be changed. d)       Click on Change Password link to change the password. Click on sign out coming on and login with new password.

CQ - What is OSGi bundle?

OSGi bundle(jar + metadata information present in META-INF/MANIFEST.MF) is collection of components which interact through service interfaces. These services are built using OSGi API and deployed in OSGi container (Apache Felix in case of CQ).  Advantages of OSGi is ·          Different modules can be installed/uninstalled/start/stop any time without restarting the server/container. ·          Different version of same module can be used in the same application which is not possible using java. System bundle is the first bundle loaded in Apache Felix (OSGi console). It is similar to bootstrap classloader in java. Bundle can be uploaded into Felix(OSGi container) through two ways a)       CQ web console b)       Putting the bundle file in install folder in jcr

CQ - How to set reverse replication from publisher to author instance

There are some forms (comments/discussions, contact us etc.) on the features which allows user to enter their input on the publisher instance. That data should be replicated back to author instance. It is called as reverse replication. Below are steps for reverse replication. a)       Open tools console and double click on Replication Agents on Author Reverse Replication Agent. Please note that it needs to be done on Author and not on publisher. b)       Double click on Reverse Replication Agent to edit its configuration. c)       Click on Transport tab to change the port to publisher port (4503 in our case) and click on OK.  d)       Now publish any comment on publisher page and it should get replicated to author instance also .e.g. post a comment on http://localhost:4503/content/geometrixx-outdoors/en/community/hiking/journal/2012/12/best_gps_for_hiking.html and it should get replicated on http://localhost:4502/content/geometrixx-outdoors/en/community/hiki

CQ - How to set replication automatically from Author instance to publisher instance

a)       Open tools console and double click on Replication à Agents on Author à Default Agent b)       It will open Default Agent in a new window as c)       Click on Edit button to open its configuration d)       Click on Transport tab and change the port number mentioned in URI tab to the port number of publisher. Once it is changed, click on OK to apply the changes. You can now edit any content in author environment and that should be automatically replicated on publisher environment. Note – There should be one replication agent for one publisher environment. It means if you want to replicate one author to two publisher instance, then two replication agent needs to be set on the tools console.

CQ - How to create a Blueprint?

a)       Open Tools console through http://localhost:4502/miscadmin b)       Expand MSM control center and click on New -> New Page button appearing on right hand side c)        It will open a dialog box similar to one shown below. Enter Title and Name. d)       You should be able to see the Test Blueprint Template under MSM control center  e)       Double click on the Test Blueprint Template row to open the Blueprint. It will open Test Blueprint in a new browser tab ( http://localhost:4502/etc/blueprints/TestBlueprint.html ). f)       Click on Edit button to enter source path,thumbnail image etc. g)       It should appear in the console  h)       Now we should be able to create a new site using new blueprint through site admin Reference - http://dev.day.com/docs/en/cq/current/administering/multi_site_manager.html

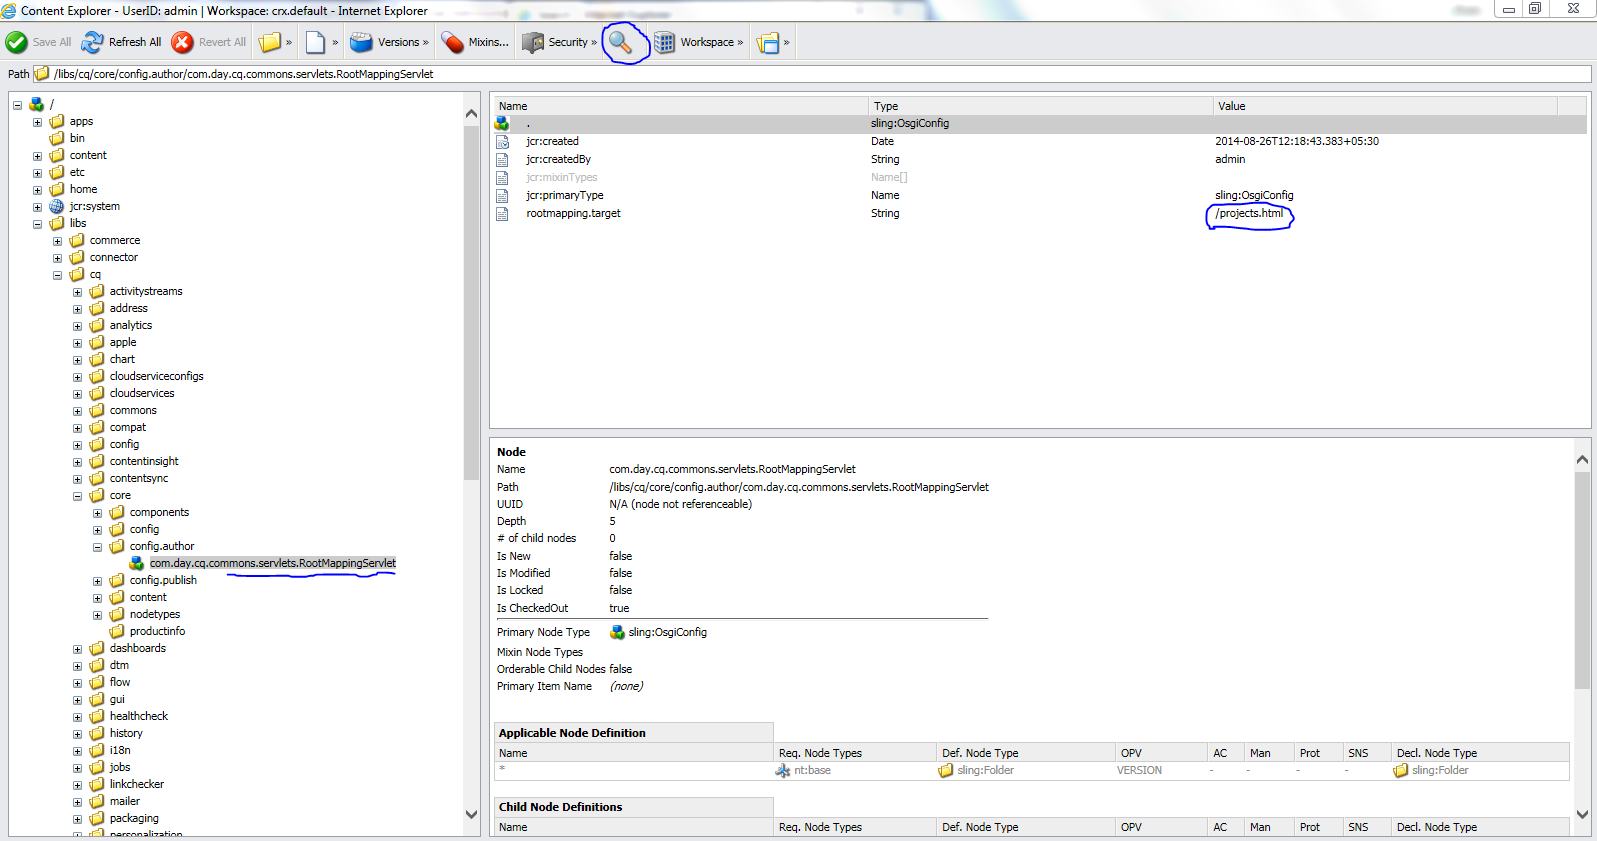
CQ - How to change default landing page from project.html (touch view) to welcome.html(classic view)?

Image
There are two approaches to change the default landing page. One is through CRX explorer and other is through OSGi console First approach (CRX explorer) a)       Open Content Explorer through http://localhost:4502/crx/explorer/index.jsp and click on Content Explorer hyperlink b)       Search for projects.html through the search icon as shown in below screenshot c)        Click on RootMappingServlet and change the value from /projects.html to welcome.html d)       Save the configuration and open localhost:4502 again. It should open welcome.html by default Second approach (OSGi/Web console)   Other approach is to change it through OSGi (Web) console. Below are steps to change is through web console a)       Open OSGi/Web console through http://localhost:4502/system/console/configMgr and click on OSGi--> Configuration.  b)       Search for “Root Mapping” in the configuration. c)        Click on Day CQ Root Mapping name. d)       Once Root